Monthly Archives: June 2008

CORN OFF THE COB

1corn

Sinking your teeth into the sweet, tender crunchiness of a fresh ear of corn is one of summer’s indubitable pleasures, the butter-slathered kernels yielding to your eager bite, the salt crusting your upper lip. For many of us, that first bite acts as a time machine, transporting us to the county fair or the Sunday afternoon backyard barbecue of our youth. My corny time machine takes me to Reino Aventura, a Six Flags-like amusement park in Mexico City where I had a Corn on the Cob, The Extreme Version: grilled corn generously schmeared with mayonnaise, sprinkled with grated cheese and chile piquín, and finished off with a squirt of lime.

But, regardless of whether it’s consumed in English or en español, nibblers will agree that eating corn on the cob has some unattractive side effects; bits and pieces of kernel stubbornly fix themselves in our gums, between our canines, incisors, and molars, making our faces contort and twitch as we not-so-discreetly attempt to dislodge them with the tips of our tongues. Even in the comfort and privacy of my own home, I can’t stand the struggle.

So, the other day when I was craving Mexican street corn, I decided I’d deconstruct the local treat and serve it forth in a bowl. It would be a much more Emily Post-ish eating experience, besides which I would be able to get larger mouthfuls (not so Emily Post, in the end).

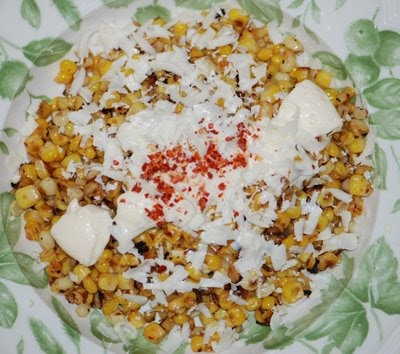
Though versions abound, this is my recipe for Mexican Corn Off the Cob. Serve it as a side dish to grilled steak, fajitas, or as a topping for quesadillas.

MEXICAN CORN OFF THE COB
Serves 2 to 3

6 ears of corn, husks and silk removed (yields approx. 3 cups of kernels)
2 tsps. corn oil
2 to 3 TBSP. mayonnaise
Juice of one lime
chile piquín or chile de árbol flakes, to taste
1/3 C. grated cotija cheese

-With a small, sharp paring knife, scrape the kernels off the cob. Work in a large shallow bowl so you can catch the kernels as well as any milk that may leak out.

-Heat oil in a large skillet over high heat until shimmering. Add kernels and toss to coat in oil. Either stir or shake kernels constantly until they are nicely toasted – I prefer mine a bit charred.

-Pour corn into a serving bowl and season with salt and pepper. Stir in mayonnaise, then sprinkle with chile and cheese. Drizzle with lemon juice and serve.
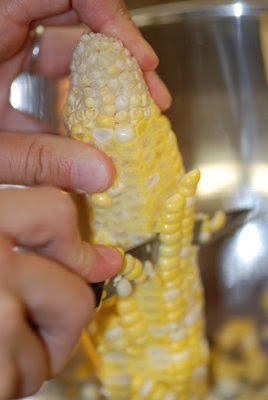
4decob“De-cobbing.”

BRAN-Y AND BEAUTIFUL

1opener

If you played a word association game and the term “bran” was thrown at you, chances are you’d blurt out responses like, “constipation!” “old people!” “laxatives!” Whenever I’m in the cereal aisle and I see that box with the big, bold All-Bran logo, cheap and very literal toilet humor comes to mind. Note to Kellogg’s: making John McEnroe the star of your 10-Day Challenge commercials isn’t going to increase cereal sales. If you were to wake up to find John McEnroe perched at your bedside, wouldn’t you just go right then and there, thereby negating the need to have a bowl of Kellogg’s All-Bran?

Let’s turn our attention now to bran in its baked incarnation: the bran muffin. It’s the ugly duckling of the breakfast breads with its dung brown color and lack of accessories in the form of streusel topping and/or chocolate chips. If you’re a late morning arrival at the office cafeteria, it’s usually only crumbs and bran muffins that remain.

But despite the fault-finding I’ve been doing, I do like bran cereal and muffins. I do! Sliced bananas and a handful of blueberries make those dry doodles agreeable, and a great bran muffin is nutty, tasty, and won’t sit like an undigested rock in your stomach. I hadn’t baked any in years, and was happily surprised with the results I got from this recipe. These muffins are moist and light and can be eaten plain, spread with butter and good preserves, or my favorite, split in half and grilled a day later. P.S. to Kellogg’s: These are a far better advertisement than Mr. McEnroe.

EVERYDAY MAPLE-BRAN MUFFINS WITH BLUEBERRIES
Adapted from “The Art of Quick Breads” by Beth Hensperger
Yields about 1 dozen standard muffins.
3optional

1 ½ C. cultured buttermilk or plain low-fat yogurt
2 eggs
¼ C. (½ stick) unsalted butter, melted
¼ C. vegetable oil
¼ C. pure maple syrup
1 ½ C. All-Bran cereal
1 ½ C. fresh or unthawed blueberries
1 C. unbleached all-purpose flour
½ C. wheat or oat bran flakes
¼ C. light brown sugar
1 tsp. baking powder
1 tsp. baking soda
¼ tsp. salt

-Preheat the oven to 400˚F with rack in the center.

-Grease a standard 12-cup muffin tin.

-In a large bowl, whisk together: yogurt or buttermilk + eggs + melted butter + oil + maple syrup + All Bran.
Stir in the blueberries and allow to stand at room temperature 5 – 10 minutes.

-In a different bowl, combine the remaining (dry) ingredients.

-Once the All Bran mix has rested, add the dry ingredients mix and stir briskly with a large spatula or spoon till evenly moistened, using no more than 15 strokes.

-Spoon the batter into each muffin cup, filling till nearly level with the top of the pan.

-Bake 20 – 25 minutes until browned and a cake tester comes out clean.

-Allow muffins to rest in tin about 5 minutes before turning out on rack to cool. Serve warm.

-To freeze leftovers: Cool completely and wrap muffins individually in wax paper and store in plastic baggies.

-To serve frozen muffins: Warm in a 350˚F oven, microwave 20 – 30 seconds, or split in half horizontally, butter both sides of each half and grill over medium heat till golden and hot.
2leftoversGrilled muffins served with fruit salad and honey-laced yogurt.

I’VE GOT THE BLUES

DSC_0043

Summer in all its fury has arrived and though I hail from tropical climes I have no tolerance for high temperatures. Try as I might to ignore it, I feel the moist heat insidiously making its way into my skin through every tiny pore, till I am overcome by it, enshrouded as if by giant moth wings. Usually, when people are gadding about frolicking in the sun, I prefer to draw the blinds and hide in the cool comfort of air-conditioning.

Summer does have its positive points of course, one of them being ice cream. Though perfectly acceptable during cooler seasons, ice cream is a treat best enjoyed when the mercury rises tall. This past weekend O and I walked down the street to J.P. Licks for a scoop and were met with a long line of eager customers. A mound of cappuccino crunch was just what we needed to bring the temperature down.

This horrid 95˚F-plus weather has been here for a few days now, and just as foodstuffs are dried, salted, pickled, and canned for the barren winter months, so must the fridge be stocked with cold, refreshing foods like crisp greens, bright fruit punches, and obviously, ice cream in anticipation of days hot and humid.

Rather than setting out daily under the unrelenting blaze of the sun for a cup or a cone, it is better to have a pint – or a quart – of something iced and creamy in the freezer. I’d come across this recipe for Blueberry Sour Cream Ice Cream in Dorie Greenspan’s “Baking” tome a few months ago, but was waiting for the appropriate weather forecast and ripe berries to come along, and finally, they did – hand-in-hand, too.

BLUEBERRY SOUR CREAM ICE CREAM
Adapted from “Baking: From My Home to Yours” Dorie Greenspan
Yields approx. 1 pint

Special equipment: ice cream maker & container in which to store the finished product – unless you plan on eating it all in one sitting, straight out of the bowl.

1 C. blueberries (you are free to use thawed and drained frozen berries)
1/3 C. sugar
Pinch of salt
Grated zest and juice of ¼ lemon
¾ C. heavy cream
¾ C. sour cream

-Put blueberries + sugar + salt + zest + juice in a medium, non-reactive saucepan and cook over medium heat, stirring, till mix boils and berries pop, about 3 minutes.

-Purée the mix in a blender till fairy homogenous, about 1 minute.

-Add heavy and sour creams and pulse just to blend.

-Taste and adjust flavor by squirting in a bit more juice, adding a pinch more salt, and/or a teaspoon of sugar.

-Refrigerate mix till completely cooled and process according to your ice cream maker’s instructions.

opener

SWINED AND DINED

1Aopener

Ever since my return from LA I’ve been thinking on the bacon-wrapped hot dog. As that ultimate of downtown delicacies doesn’t exist in my current place of residence, I would have no choice but to recreate it in the confines of my kitchen. Last week, as the object of my consideration became an obsession, it became a tentative item on the week’s dinner menu. Though I was eager to undertake Mission Bacon Dog, there were details that needed to be sorted out, for instance: What variety of frank would be the best? How thick did the bacon it would be draped in be? Also, what garnishes should top it? In LA it was a veritable Mexican parranda, with guacamole, grilled jalapeños, and sautéed onions and peppers, but did I want a different, more personalized theme?

I started researching garnishes and was in the midst of studying homemade pickling, when suddenly, at 6:00pm on Wednesday last week, my ruminations came to a jaw-grinding halt: I discovered there was no Spanish chorizo to be had at Whole Foods. Spanish chorizo was the key ingredient in the recipe I’d intended for dinner, and without it, I had nothing.

Plan B-less, I looked around in a panic. It was getting late, the after-work crowd had descended, Señor O was growing irritable, and though I kept pressing myself into the corner of a cereal display, shoppers trying to squeeze past were giving me the stink eye. I kept staring at the bins of salami, willing them to transform into the chorizo I needed, but salami they obstinately remained.

I’d had ample opportunity to view the stacks of hot dog packs while on my desperate search for chorizo, and knew all I had to do was reach out and grab one, but truth to tell, I didn’t want that particular Wednesday to be Mission Bacon Dog night because all the variables weren’t in place, but I was between a rock and a hard place – i.e. Señor O’s glare – so I caved in and bought a package of all-natural Wellshire Frank beef hot dogs, a few slices of Whole Foods bacon, and a bag of buns.

Now, another of the questions I’d been pondering was how to keep the bacon in place while the wiener cooked. There were no sticks or strings on the LA one, and I was determined not to cheat. I was concerned, however, because the bacon was a little too thick and a bit raggedy to boot. Also, I’d had to use one-and-a-half slices per sausage because one wasn’t enough to spiral around the whole thing.

I assumed/hoped that the tacky quality of the meats would be enough to adhere them to each other, and to my surprise, the bacon held even after I gently laid two blanketed dogs in the skillet. A mound of onions that I’d set to cook earlier was melting into a caramelized pile while the bacon dogs sizzled and released a deliciously porky aroma.
1Everything in its place.

The Mission was going smoothly until I tried to turn the hot dogs; the bacon started to peel off. With the help of tongs and a spatula, I did the best I could to keep the hot dogs clothed, but it they were beyond help. We were starving by this time and the smell of frying bacon and onions was overpowering.

3
Take it off!

I finished stripping the hot dogs and waited for the whole mess to brown, then I stuffed a hefty helping of the dripping mess into a warm bun and settled down to a dinner that would make those LA vendors proud.
4


DON’T TRY THIS AT HOME

Garrobo

Today’s New York Times Dining & Wine section has a great article by Kim Severson titled Recipe Deal Breakers: When Step 2 is ‘Corral Pig’. She discusses the frustrations suffered by even the most adventurous and experienced cooks when they run into recipes with phrases such as “if you don’t have a helper,” or ingredients lists with impossible to obtain items like “wild boar from the hills surrounding Santa Fe.”

Usually, when a recipe seems convoluted and complicated, I simply plan ahead. I shop early, scouring shops all around town and ordering items online if necessary, and then I block out a day to spend uninterrupted in the kitchen. However, even my gung-ho-edness has its limits. While I have yet to encounter a recipe that requires me to corral a pig, I return time and again to my basic book of Nicaraguan cookery: 50 años en la cocina con doña Angélica, to read, for sheer entertainment’s sake, the recipe printed on page 58 of the 9th edition (published 2006): iguana en pinol. This plato típico (traditional dish) calls for one whole iguana, peeled. Just like that. Some recipes are indeed better left alone.

For your reading enjoyment, I have translated the recipe.

IGUANA EN PINOL

“This is a traditional Nicaraguan dish, product of the time-honored culinary creativity of Granada. As the iguana is a cold-blooded animal, the consumption of its meat is permitted on Wednesdays and/or Fridays during Lent, traditionally regarded as days of observance; besides, that season coincides with the oviparous reproductive period of that esteemed reptile, whose soft-shelled eggs are mostly yolk-filled, are considered by those in the know as true ‘DELICATESSEN.’
Sensible were the first naturalists that classified it in giving the name “IGUANA DELICATISSIMA.”

2 C. corn
1 whole iguana, peeled
2 sour oranges
8 C. water, with salt
1 head of garlic, pounded
1 onion, sliced
1 tsp. whole peppercorns
3 large onions, chopped fine
2 C. lard
1 tsp. ground black pepper
sour orange juice
6 small onions, sliced thin
¼ C. lard

-A day ahead, lightly toast the corn, without letting it brown; mill it in the machine, leaving a bit coarse and store it.

-Early the following day, buy the iguana at the market with its corresponding ration of eggs; wash it well with the sour orange juice, cut it into small pieces and boil it in the salted water, along with the garlic cloves, the onion, and the peppercorns, until it’s soft; remove it from the fire, and strain it. Reserve the liquid.

-Measure out 4 C. of the corn you toasted and milled; add the reserved broth, and return it to the heat, stirring constantly until thick and well cooked. In a casserole that can be presented at the table, fry the (3) onions in the (2 C.) lard over moderate heat, until the are lightly golden; add the cooked corn, the ground pepper, and sour orange juice to taste; cook everything over low heat, taking care that it doesn’t dry out.
-Add the iguana and cook a bit longer.
-Fry the (6) sliced onions in ¼ C. lard and reserve both.
-Boil the eggs for 3 minutes in boiling water with chili and reserve, warm.
-Serve the iguana in the casserole/serving dish, and drizzle over it the onions and lard. Garnish with the eggs.

Serves 12.

PEACHY KEEN

6shortcake1
Just as soon as the weather turned warm, I became fixated on the idea of grilled peaches. I could picture them in all the glory of their sunset hue; ripe, juicy flesh tattooed with smoky grill marks…a dreamy side to a charred and crispy-skinned chicken leg…
That idyllic snapshot quickly faded when I discovered that the BBQs on our apartment complex’s rooftop are equipped with nothing but a puny electric rod, more similar to an archaic space heater than a grill. I may as well plop my food on top of my toaster oven.

Since grilling was clearly an impossibility, I would poach the peaches. Granted, they would not be branded and flame-licked, but they could still be remarkable, especially as a side to salty, broiled pork loin. Make these peaches for dinner and be sure to throw in a few more for Peachy Keen Shortcakes.
4servewithporkRoasted pork loin with cherry poached peaches and sautéed broccoli rabe.

CHERRY POACHED PEACHES

6 ripe but still firm peaches
3 C. tart cherry juice
2 C. granulated sugar

-In a saucepan, combine cherry juice and sugar and bring to a boil, stirring until sugar is dissolved. Reduce to a low simmer.

-In a pot large enough to accommodate the peaches, bring four quarts of water to boil. In the meantime, set up an ice bath.

-With a paring knife, gently draw a small “X” on the bottom end of the peaches.
1Xyourpeach-Gently slide peaches into the boiling water. Allow about 20 seconds and quickly scoop out into the ice bath with a slotted spoon to stop the cooking.

-This blanch-&-shock process will have loosened the skins. With a delicate hand, pull the skin away from the flesh, starting at the “X” you previously carved.
2blanchandshock-With a small knife, cut the peach in half, tugging at each to reveal the pit: remove and discard. Cut each half in half, lengthwise and slip into the simmering cherry syrup. Poach peaches 15 – 20 minutes and allow to come to room temperature.
3poachNOTE: Peaches are either clingstone, freestone, or semi-freestone. As the name implies, “clingstone” peaches will have flesh that tightly clings to the pit. Removing the fruit from the stone is thus a bit more difficult, so if given the choice, go for the freestone or at least the semi-freestone.

PEACHY KEEN SHORTCAKES
For 2 servings
This recipe is a play on more traditional fruit shortcakes and make a gorgeous brunch item.

4 Best Ever Biscuits (Sweet Variation)
3 cherry poached peaches, at room temperature
1 container Greek yogurt (between 5 – 6 oz), stirred to smooth

-As soon as the biscuits come out of the oven, pull apart into two halves.

-Top bottom half with three peach wedges and drizzle with poaching syrup. Dollop generously with yogurt and cover with the (sugar sprinkled) half.
7shortcake2